
NumericIndicator
NumericIndicator (Numeric Indicator)
The NumericIndicator is an indicator object used to display numeric data in a stylish and industrial format.
Unlike a standard Label object, this object typically resembles a digital counter, odometer, or mechanical numerator. By displaying numbers within segments, it allows the operator to read the value quickly and accurately.
Info: This object shares the same technical infrastructure as the CircularGauge and LinearGauge. The only difference is that it displays data directly using numeric characters (Digital) rather than a graphical needle.

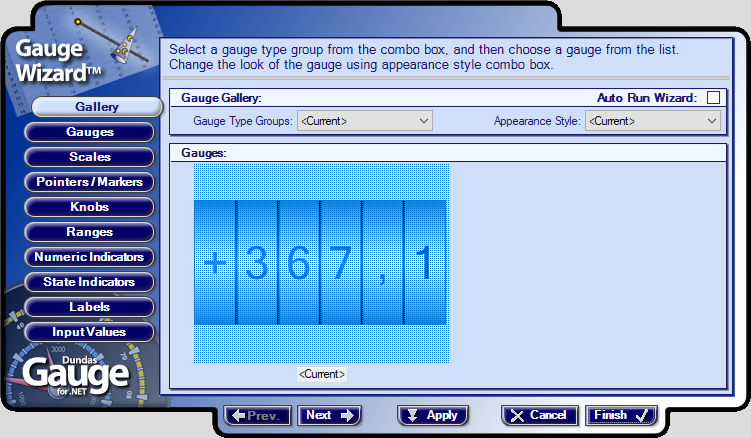
Quick Design: Gauge Wizard
The most practical way to configure this object is to use the Wizard located in the Advanced panel. Instead of configuring settings from scratch, you start with ready-made templates.
- Open Wizard: Select the object and go to the Advanced panel. Click the button next to the Wizard row under the top Custom category.
- Gallery: In the window that opens, navigate to the Gallery tab from the menu on the left.
- Select Type: Open the “Gauge Type Groups” box and select Numeric Indicator.
- Select Template: The templates in the gallery will transform into horizontal or vertical bars. Select a style you like from the menu on the right, pick the specific gauge, and click Finish.
- Result: Your gauge will transform into the selected professional design (colors, frame, needle type, etc.) within seconds
Properties Panel – Key Properties
Value
- Indicator1 (Tag):
- This is the main connection that determines the number displayed on the indicator.
- Bind a Tag here. As the tag’s value changes, the digits on the indicator update (either instantly or with an animation).
Events
- Mouse Down / Mouse Up
- Can be used to trigger an action (e.g., opening a detail page or resetting a counter) when the operator clicks on the indicator.
Advanced Panel – Key Properties
This panel is where you manage the design and structure of the indicator. Since this object is part of an advanced “Gauge” library, its settings are grouped under the Gauge Container.
Gauge Container
This category manages the components inside the indicator:
- NumericIndicators (Collection):
- Clicking the (…) button next to this row opens the detailed settings for the numeric display.
- Capabilities:
- Digit Count: Set how many digits the indicator will have (e.g., 6 digits).
- Decimal Places: Determine the number of decimal places.
- Style: Adjust the font and color of the digits.
- BackColor:
- The general background color outside of the frame.
- AntiAliasing:
- Importance: It is recommended to set this to All or High. It softens the edges of numbers and lines, preventing a jagged appearance and providing a much more professional, smooth look.
- ShadowIntensity:
- Adjusts the density of the shadow to add depth (3D effect) to the indicator.
- RefreshRate:
- The refresh rate of the indicator per second. The default value is usually sufficient.
Common Usage Example
Example: Production Counter (Integer)
To display the total number of products on a production line as a 6-digit counter.
- Add a NumericIndicator to the screen.
- Go to the Advanced panel -> Gauge Container -> Open the NumericIndicators collection.
- Set the Digit Count to 6.
- Set Decimals to 0.
- Go to the Properties panel.
- Bind the Production_Count tag to the Value -> Indicator1 (Tag) property.