
Trigger Configuration
Trigger Configuration
Trigger List and Management
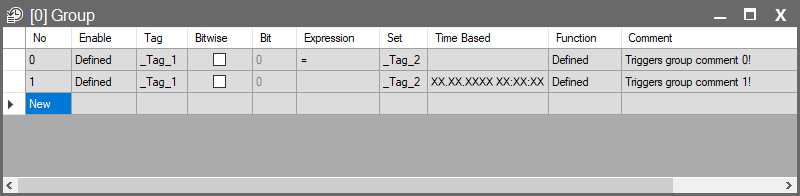
In the image above, you can see the configuration window for a trigger group.
In this interface, each row represents an individual trigger.
- Add Trigger: To define a new trigger, simply click the New row at the bottom of the list. Alternatively, you can click the Add button in the toolbar.
- Editing: Right-click on existing rows to quickly perform actions such as Delete, Copy or Paste.
- Sorting: If you have many triggers, you can click on the column headers to sort the list alphabetically or numerically.
The purpose and configuration details of each column (parameter) in this window are explained in the table below.
| Parameter | Description |
| No | Automatically assigned line number for each trigger. |
| Enable | Determines whether the trigger is active. |
| Tag | The main tag whose value will be checked as the trigger condition. |
| Bitwise | Enables triggering based on a specific bit change rather than the entire tag value. (Cannot be used with DATE, TIME, DATETIME, or STRING tags.) |
| Bit | Indicates which bit will be monitored (e.g., bit 0, bit 1). |
| Expression | Logical operator defining the triggering condition. |
| Set | The target value to compare against the main tag. The entered value must match the tag type. Constant values must be written in quotation marks, e.g., “true”, “false”, “128”, “65765”. |
| Time Based | Used for time-based triggering independent of tag changes. Must be entered in the format dd/MM/yyyy HH:mm:ss. |
| Function | Defines the functions to be executed when the trigger occurs. Refer to the Function window documentation for detailed information. |
| Comment | Used to add notes or descriptions about the trigger. |
Parameter Details
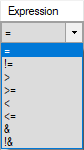
Expression
The logical expression that defines the trigger condition.
Example:
Tag > 80 → Generates an alarm when the temperature exceeds 80.
Enable
- Determines whether the trigger is active.
- When clicked, the Compare Dialog window opens, allowing you to define a condition. After clicking OK, the Conditions Dialog opens, where multiple Enable conditions can be added.
- If any of the defined conditions evaluate to true, the trigger becomes active.
Tip: If you want the trigger to always remain active, simply leave this field empty.
Time Based
- This field allows the trigger to run at a specific date, time, or periodic intervals independent of any tag change.
- Time format: dd/MM/yyyy HH:mm:ss (Day.Month.Year Hour:Minute:Second)
“X” Character
- The character X means Any or Every, allowing you to create complex periodic schedules.
- Full Wildcard (Every Second)
- The default value is: XX.XX.XXXX XX:XX:XX This means the function will execute continuously, once every second.
- Fully Specified (One-Time Execution)
- If you write: 01.01.2026 12:00:00 the function runs only once, exactly at that date and time.
- Full Wildcard (Every Second)
Range Definition
- By replacing only certain digits with X, you can create repeating intervals.
- Example Scenario (1X Pattern):
If you enter 1X in the seconds field (… XX:XX:1X). The system accepts all seconds where the tens digit is 1.- Result: The function runs every second between 10–19 (10, 11, 12 … 19).
- If you want it to run only at the 10th second, do not use X—enter 10 directly.
Common Time-Based Scheduling Examples
| Format | Runtime Behavior & Description |
| XX.XX.XXXX XX:XX:XX | Every Second: Executes once per second (default). |
| XX.XX.XXXX XX:XX:30 | Every Minute: Executes at the 30th second of every minute. (e.g., 14:05:30, 14:06:30…) |
| XX.XX.XXXX XX:00:00 | Every Hour: Executes at the beginning of every hour. |
| XX.XX.XXXX 00:00:00 | Midnight: Executes daily at 00:00:00 (useful for daily reporting/counter resets). |
| 01.XX.XXXX 08:00:00 | First Day of Each Month: Runs at 08:00 on the 1st day of every month. |
| XX.XX.XXXX XX:XX:1X | 10–19 Seconds: Executes every second between the 10th and 19th seconds of each minute. |