
AlarmView
AlarmView (Alarm Viewer)
AlarmView is an advanced, All-in-One table used for Real-Time monitoring, Historical querying, Acknowledging, and reporting of alarms generated in your project.
It is not merely a standard data table; it is a fully equipped alarm management center featuring integrated filtering menus, export options, and acknowledgment mechanisms.
Basic Configuration (Most Critical Step)
The AlarmView object MUST have a database connection to function.
- Database Definition: First, the database where alarms will be logged (SQL Server, MySQL, or SQLite) must be defined in the “Databases” section of your project.
- Connection Selection (Advanced Panel): Select the AlarmView object and go to the Advanced panel. Under the 0. Settings category, find the Database property and select the database you defined earlier.
Note: If a database is not selected, the object will appear empty and will not display any alarms.
Properties Panel – Key Properties
- Visible / Enabled
- Can be bound to various conditions to hide the entire table or render it inactive (grayed out).
Advanced Panel – Key Properties
Settings (General Settings)
- Database (VERY IMPORTANT)
- The database connection from which alarms will be read.
- ViewMode
- Determines the default opening mode of the table.
- Active: Lists only currently ongoing alarms. When an alarm condition returns to normal (e.g., sensor fixed), that row is automatically removed from the list.
- Historical: Lists all past events recorded in the database, regardless of whether they are currently active. All movements, such as when an alarm started, ended, and was acknowledged, are displayed chronologically.
- Acknowledge: Typically used to filter Active alarms that have not yet been seen or acknowledged (Unacknowledged) by the operator.
- FixedGroup
- If you want this table to display only a specific alarm group (e.g., “Fire_Alarms”), enter that group’s name (ID) here. If left empty, it displays all groups.
- FixedPriority
- Used to display alarms of only a specific priority level (e.g., Critical).
- MaxRows
- The maximum number of rows to fetch from the database at one time to preserve performance (Default: 1000).
- ResetTime
- The time (in seconds) to wait before the screen automatically reverts to “Real-Time” mode after filtering operations.
- AckAllPasswordLevel / AckPasswordLevel
- The minimum authority level required for the operator to use the “Acknowledge All” and “Acknowledge” buttons. (0 = No Password).
- ExportPasswordLevel
- The authority level required to use the Excel or PDF export buttons.
Child Controls & 2. Filter Panel Controls (Visual Customization)
AlarmView is a composite object containing many buttons, labels, and input boxes. These lists allow you to access each individual part within the object.
- How to Use?
- Example: If you do not want the operator to take PDF outputs:
- Find the _PDFButton row in the Child Controls list.
- Click on the text Properties next to it.
- In the window that opens, set the Visible property to False.
- What Can Be Changed?
- Text on buttons (e.g., changing “Find” to “Search”).
- Colors, Fonts, and Icons.
- Visibility (Visible) and Activity (Enabled) states.
- Table column headers (_ResultGridColumns).
Runtime Usage
Operators use the following tools on the Runtime screen:
Toolbar
- Ack (Single Acknowledge)
- Acknowledges the selected alarm. The current time is written to the alarm’s “Ack Time” column, and flashing stops.
- Ack All
- Acknowledges all displayed alarms in the list at once.
- Real-Time Mode
- Cancels filtering and returns to the most current, live alarm list.
- Navigation
- Allows navigation between pages of past alarms.
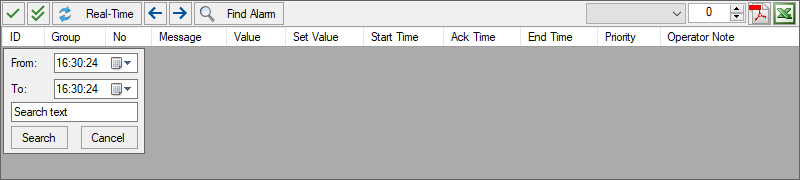
- Find Alarm (Filter)
- Toggles the detailed search panel on/off.
- Export
- Exports the current list in PDF or Excel format.
Filtering Panel (Find Alarm)
The panel that opens when the Find Alarm button is pressed:
- From / To (Date Range)
- Used to query alarms within a specific time range.
- Search Text
- Used to search for a specific word (e.g., “Motor 1”) within the alarm message.
- Search
- Sends the query to the database and lists the results.
Tip: Operator Note
The “Operator Note” column allows operators to right-click on an alarm row and enter special notes regarding that fault (e.g., “Sensor replaced”). These notes are permanently stored in the database.