
Symbol Dialog
Symbol Dialog (Symbol Library)
This window, which opens when you drag and drop a Symbol object onto the screen or click the Advanced -> Wizard button, allows you to access Wise SCADA’s extensive vector graphics library and customize the symbols.
The window consists of two main tabs: Symbols (Selection) and Style (Customization).
1. Symbols Tab (Library Selection)
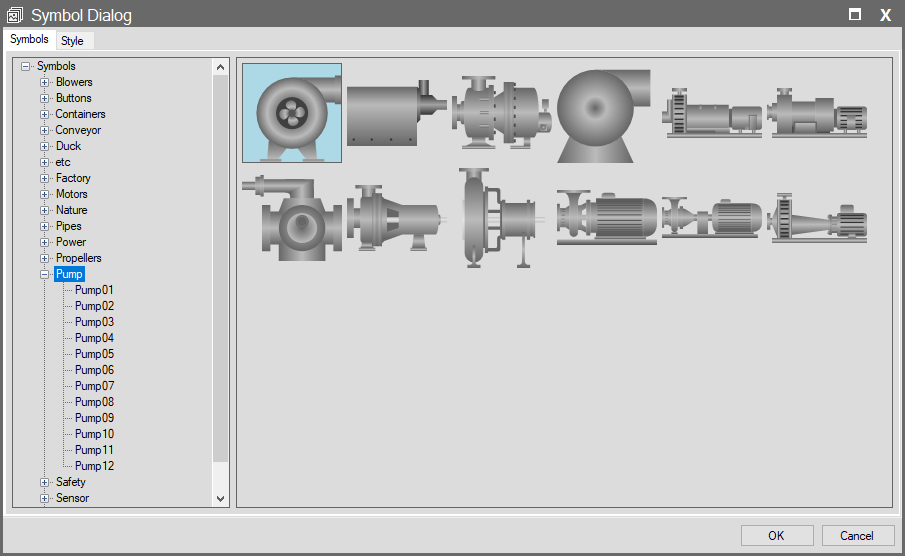
This is the catalog screen where you locate the object you wish to add to your project.
- Categories (Left Panel): Industrial groups such as Motors, Valves, Tanks, Pipes, and Buttons are listed here.
- Symbol List (Right Panel): Vector drawings belonging to the selected category are displayed here.
- Usage: Select the symbol that fits your needs here, then switch to the Style tab above for detailed settings.
2. Style Tab (Appearance and Animation Settings)
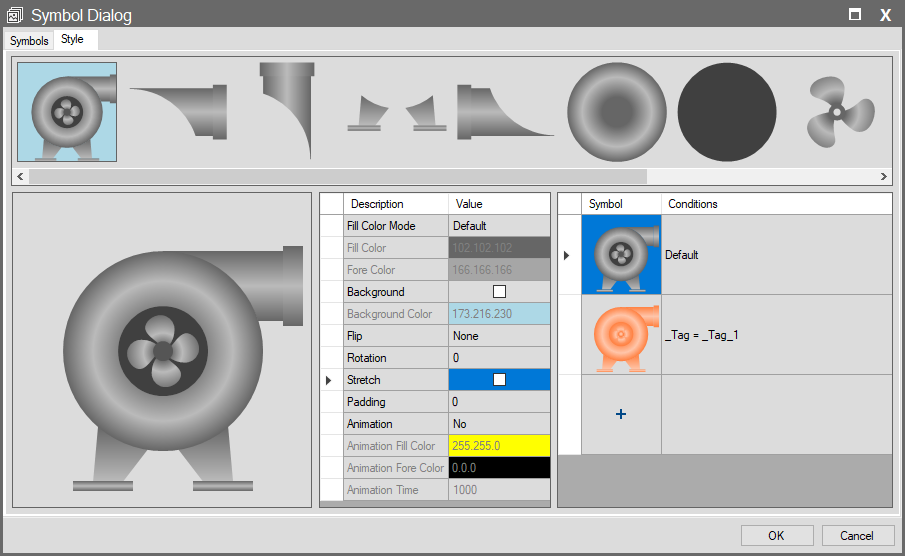
This is an advanced editor where you manage the selected symbol’s colors, animations, and state-dependent changes.
A. Sub-Groups (Top Menu) The horizontal strip at the very top of the window displays the individual parts of the selected symbol.
- Logic: A fan symbol is not a single piece; it consists of sub-parts like “Body,” “Blade,” and “Leg.”
- Customization: From this strip, you can select just the “Blade” part and assign it a Rotation animation, or select the “Body” part and change its color. If no specific part is selected, settings are applied to the entire symbol.
B. Appearance Settings (Middle Panel) The settings in this panel determine the visual properties of the currently selected part.
- Fill Color Mode: Determines how the object is painted:
- Default: Uses the symbol’s original colors.
- Default Edge: The symbol appears in original colors, but a distinct outline (contour) is added. The outline color is determined by the ForeColor property.
- Solid: Paints with a single, flat color.
- Solid Edge: Paints with a single, flat color and adds an outline.
- Shaded: Applies a shaded, 3-dimensional effect.
- Shaded Edge: Applies a shaded, 3-dimensional effect and adds an outline.
- Hollow: Provides an empty interior with only a frame/border.
- Fill Color: Determines the main color of the object.
- Fore Color: Determines the color of the object’s outline/edge.
- Background: Adds a rectangular background behind the symbol.
- Flip: Reflects the symbol across axes to change its orientation.
- Rotation: Sets the symbol’s starting angle in degrees (0, 90, 180, etc.).
- Stretch: If checked, the aspect ratio is not preserved when resizing the symbol; the symbol is stretched to fit exactly inside its bounding box.
- Padding: Determines the amount of empty space (in pixels) to leave between the symbol drawing and its surrounding selection frame.
C. Animation Settings Used to impart movement to the object.
- Animation:
- No: No animation.
- Default / Shaded / Solid: Blinking effects. Colors toggle between the settings defined above and the color defined in Animation Fill Color.
- Rotation: Rotates the selected part around its own axis.
- Important Note: Rotation is not suitable for every object. It works properly only on circular parts suitable for spinning, such as Blades, Motor Shafts, or Gears.
- Invisible: Animation for hiding and showing the object.
- Animation Time: The speed of the animation (in milliseconds). Lower value = Faster animation.
3. Conditions (State Management – Right Panel)
This is the most powerful feature of symbols. You can change the symbol’s color or animation based on the value of a Tag.
- Default: How the symbol looks when no conditions are met.
- Adding a New Condition (+):
- Click the + button to add a new row.
- Define a condition (e.g., Motor_Running == 1).
- While this condition is selected, set the symbol’s color (e.g., Green) and Animation (e.g., Rotation) from the left panel.
- Result: In Runtime, when the tag becomes 1, the symbol automatically turns Green and starts rotating. When the tag becomes 0, it reverts to its “Default” state (e.g., Gray and Static).