
Function Dialog
Function Dialog
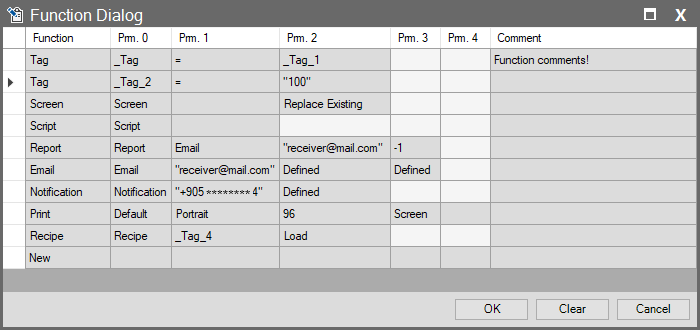
Use this dialog window to define the functions and necessary parameters for your projects. Functions determine actions triggered by specific events. Start by selecting a function type from the left column, then configure specific settings using the parameter fields on the right. Each function offers different options based on its requirements. This section is one of the most essential tools for building your project’s automation logic.
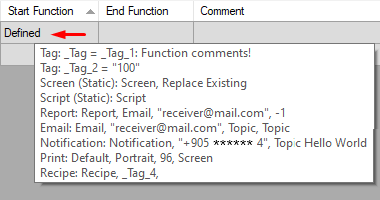
In the Function Dialog window, configured functions are indicated by the label Defined. This means one or more functions (Tag, Screen, Script, etc.) have been set for the relevant event. This label keeps complex interfaces clean and readable. To view the content of a function, hover your mouse over the Defined text. This opens a list quickly showing all functions and parameters defined in that row.
Tag
Use this function to assign or change a tag’s value. Parameters determine the tag name, operation type, and the value to assign.
- Prm. 0: Select the tag to be assigned.
- Prm. 1: The operation type is equality and cannot be changed.
- Prm. 2: Select a tag. It must match the tag type specified in Prm. 0. If you want to enter a constant value, you must enclose it in double quotes (e.g., “100”, “true”). This value must be compatible with the type of the tag selected in Prm. 0.
- Comment: Use this to add a short note explaining the purpose of your action.
Screen
Use this function to open a new screen or change the current one. It defines which screen to open and how to display it.
- Prm. 0: Select the name of the screen to open.
- Prm. 1: Select a string-type tag for dynamic screens. You cannot use Prm. 0 and Prm. 1 simultaneously; select either a static screen name or a dynamic tag.
- Prm. 2: Determine how the screen will open:
- Replace Existing: Replaces the current screen with the new one.
- New Window: Opens the new screen in a separate window.
- Dialog: Opens the new screen as a dialog window.
- Close: Closes the current screen.
- Comment: Use this to add a short note explaining the purpose of your action.
Script
Use this function to execute a defined script.
- Prm. 0: Select the script to run.
- Prm. 1: Select a string-type tag for a dynamic script. This tag contains the name of the script to be executed. If using a dynamic script, leave Prm. 0 empty.
- Comment: Use this to add a short note explaining the purpose of your action.
Report
Use this function to generate a report and send it via email.
- Prm. 0: Select the report to be emailed.
- Prm. 1: Select the email account to use for sending. This account must be defined in the Setup/Emails section. You can create a new email account using the + icon.
- Prm. 2: Enter the recipient’s email address in double quotes. You can also select a string-type tag for a dynamic recipient.
- Prm. 3: Set the maximum file size (MB) for the email attachment. Enter -1 for unlimited size.
- Comment: Use this to add a short note explaining the purpose of your action.
Use this function to send an email from a defined email account.
- Prm. 0: Select the sending email account. This account must be defined in the Setup/Emails section. You can create a new email account using the + icon.
- Prm. 1: Enter the recipient’s address in double quotes. You can also select a string-type tag for a dynamic recipient.
- Prm. 2: Determine the subject of the email.
- Prm. 3: Enter the content of the email. Double-click Prm. 2 or Prm. 3 to open a content editor window.
- Comment: Use this to add a short note explaining the purpose of your action.
Notification
Use this function to send notifications to users via various methods (SMS, Telegram).
- Prm. 0: Select the notification to use. Create a new notification with the + icon.
- Prm. 1: Enter the target (phone number, Telegram Chat ID, etc.) in double quotes. You can also select a string-type tag for a dynamic target.
- Prm. 2: Determine the notification content. Double-click to open a content editor window.
- Comment: Use this to add a short note explaining the purpose of your action.
Use this function to print the screen or a specific object.
- Prm. 0: Select the printer to use.
- Prm. 1: Set the print orientation (Portrait or Landscape).
- Prm. 2: Enter the print DPI (dots per inch) value.
- Prm. 3: Select the screen to print.
- Prm. 4: Enter the name of the object on the selected screen to print. If left empty, the entire screen is printed.
- Comment: Use this to add a short note explaining the purpose of your action.
Recipe
Use this function to load, save or delete recipe data.
- Prm. 0: Select the recipe to work with. Create a new recipe with the + icon.
- Prm. 1: Specify the name of the record to process. You can also use a string-type tag to select a dynamic record.
- Prm. 2: Select the operation to perform (Load, Save, Delete).
- Comment: Use this to add a short note explaining the purpose of your action.